Time Out has several handy options, some of them only available to current or past supporters, as a reward for helping improve the app.
One such option is the ability to hide the app icon from the Dock. By default, the icon is shown there, for easy access, but if you want Time Out to operate more in the background, you can choose to remove the icon.
If you do so, the second option is automatically turned on: the checkbox to show a status item on the right-hand side of the menubar. This item has further options to choose what to include there.
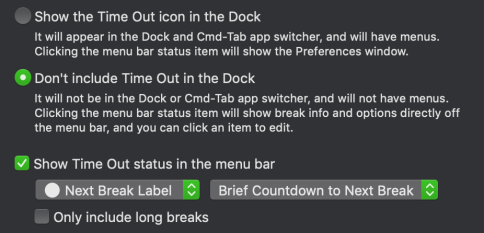
The status item can optionally include a variation of the app icon, the label color of the next break, or neither:

It can also include a countdown to the next break, either in a compact form like “7m” for 7 minutes, or a wider form like “07:32”, for 7 minutes and 32 seconds. In the compact form, it only shows seconds when less than a minute. That’s my favorite form, to attract attention when getting close to a break.
Alternatively, the value can show the time when the next break is due, or will finish, or how long it is. Or no value, just an icon:

There’s a further checkbox to only show long breaks in the status item, i.e. don’t show ones with a duration of less than a minute.
A further useful tip about the status item is that if you hover over it, a tooltip will appear that lists when the upcoming breaks are next due:

When the Dock icon is shown, clicking the status item will bring Time Out to the front, to show the settings window. When the Dock icon is hidden, clicking it will display a menu-like popover of the sidebar, for quick background access to the breaks and options. Clicking one will expand to the full window.
You may wonder what happens if you hide both the Dock icon and the status item. The window will display a warning message:

As the message says, if you do this, you can still access the settings window, though it’s a bit harder. You would need to find Time Out in your Applications folder and double-click it to make it active. Since the Dock is hidden, it won’t show a menu bar, so there isn’t a visual indication that it is active, but you can press ⌘, (i.e. Command and Comma together), which is the keyboard shortcut for the Settings window, to show it.
Some people like doing this, to discourage changing settings, but most people should show either the Dock icon or status item, or both.


