Simon tip: groups

One feature request that I received many times for Simon was the ability to organize tests into folders or groups — especially useful for people with lots of tests, or simply want to collect all tests relating to a particular server or client together.

Tests can be grouped together however you wish. It’s easy to create a group: simply choose the New Group command in the File menu or the + pop-up menu, then drag the tests into the new group. Even easier, you can just select some tests and choose the New Group with Selection command to make a group and move those tests into it in one step.

New menu

Groups appear with disclosure triangles, enabling them to be collapsed. The group row shows a summary of the contents, with any common values displayed for easy reference. And similarly, the info pane shows a summary of the contained tests.

Tests

Groups can even be nested, if desired — you can have an unlimited number of groups within other groups, if that helps organize them.

But wait, there’s more! While grouping tests is perhaps one of the most-requested features, I didn’t stop there: you can also group services, filters, notifiers and reports in the same way!

Notifiers

When these items are grouped, they appear indented in the Kind pop-up menu in the test editor, so you can keep related items together:

Popup

I hope you enjoy this feature.

Simon tip: hide the Dock icon

Simon has a feature that many people have asked for over the years: the ability to hide the app from the Dock.

By default, the Dock icon is shown, but there is an option in the General Settings to hide it.

Why might you want to hide it? Maybe you want to keep your Dock as sparse as possible. Simon’s Dock icon can display the most interesting status, but maybe you don’t need to see that all the time, or you’re satisfied with seeing that only in the status menu. Since you’d probably want to keep Simon running all the time, treating it as a background-only app can make a lot of sense. Now you can!

General Settings

If you turn off the Show the Simon icon in the Dock checkbox, the app icon vanishes from the Dock, and also from the Cmd-Tab app switcher. Note that if you have chosen the Keep in Dock option in the Dock menu, the icon will linger, in an inactive state; you can disable that or drag the icon out of the Dock to remove it.

When Simon is hidden from the Dock, you can still activate the app via the status menu, if you have that enabled — and the app will automatically turn it on when you turn off the Dock icon, as a convenience. If you don’t want the status menu, you can turn it off again… in which case the only way to activate the app will be to click on one of its windows, if any are visible, or open it from the Finder.

One thing to note is that as a necessary side-effect of hiding the Dock icon, Simon will no longer have a menubar. It’ll truly be a background-only app. When you display the Simon Monitor window, the menus won’t change from whatever other app you were using. This isn’t a problem for most functions, as the toolbar buttons and sort drop-down menu options cover most menu commands. But for app functions like checking for updates, accessing preferences, etc, when the Dock icon is disabled a special action menu is added to the toolbar. For power users, the keyboard equivalents still work, too — so you can press Ctrl-Cmd-1 to switch to Preview mode, for example.

Actions

I know that this is an exciting feature for many customers. For anyone who wants Simon to “disappear” into the background, try turning off the Dock icon. You can always turn it back on again. No restart required.

Simon password protection

Simon includes a password feature, that can be used to require a password when Simon is launched or activated. This provides some level of security to prevent unauthorized people from accessing the app. It doesn’t encrypt data or any other changes, it’s just a simple access control.

By default, a password is not required. If you want to require one, open up the General Settings. Notice the Choose Password… button and the text to the left indicating that a password hasn’t been set:

Password not required

Click the button to display the password sheet. If a password hasn’t already been set, the first field will be disabled (and display “None”). If one has been set, enter the existing password there. The next two fields are for the new password; enter the same one in both, or leave them both blank to disable the password feature. If entering a password, you should also enter a hint that will remind you of the password (without being too obvious):

Password sheet

After setting a password, the text in the Settings window will change to indicate so:

Password required

When a password has been set, whenever you activate Simon it will display an unlock sheet, asking for the password. It includes a Quit button to quickly stop Simon, and a Cancel to deactivate Simon. After two failed attempts, it will display the password hint (if any); after two more failed attempts, it’ll disallow further attempts until after you quit or cancel:

Unlock

I expect that most people won’t need this feature, but for those who do, it should prove quite useful.

A Simon filters case study

Before I moved the Dejal blog to WordPress, I had a test that was bundled with Simon called “Dejal posts” (you may still have this if you’re a long-time customer). This was a great example of using multiple filters to narrow down the output of a Web Page service. While the URL it monitored is no longer valid, it remains a useful example for you to learn more about creating your own filters.

The general idea of this test was to look at a “Recent Posts” page of the Dejal site, which listed all recent blog, forum, FAQ etc posts and their comments, and output some tidy text describing the most recent one, along with a changed state when a new post or comment is added.

Firstly, here’s the Service page; nothing remarkable here (the cookies are automatically recorded, and unimportant for this test):

Service

The most interesting page is the Filters one:

Filters

When you check the test and look in the Activity log, you can see the output from each of those filters (from bottom to top):

Activity

Another way to view the output is via the Preview pane, which includes not only the service response and headers, but also the full output of each filter, to help you diagnose each step.

Here’s the output of the service; the full HTML of the web page:

Preview0

Let’s break down each of the filters, via the Preview filter output.

The first filter, a Block one, takes the service response as its Input, and has Start text of <tbody> and End text of <td class="replies">. This finds the first occurrence of each of those bits of HTML in the service response, which corresponds with the most recent post information:

Filter1

This filter outputs that:

Preview1

The second filter is another Block one. It takes the output of the first filter as its input, and narrows it down further to just the title of the post. Notice that it also uses options disclosed on the right-hand-side of the filter configuration: it looks for the second occurrence of the Start text, searching from the beginning of the input:

Filter2

The output of this filter is the post title:

Preview2

The third filter is yet another Block (it is one of the most useful filters), but the input is different: this time it uses the output of the first filter, instead of the previous one (as is the default). It also has an option to look for the third occurrence:

Filter3

It extracts the author information:

Preview3

Filter number four is different. It uses an Ignore Links filter to extract out just the author name from the previous filter output. The previous filter doesn’t do this as when you were not logged in on the Dejal site, only the name is included (in which case this filter has no effect):

Filter4

The output is just the non-HTML part of the input:

Preview4

Next we’re back to a Block filter again, but this time looking at the original service response text to extract the number of replies to the post:

Filter5

This should always output a number:

Preview5

We then use a Singular or Plural filter, to take the number found in the previous filter and output “reply” if it is one, or “replies” for any other number:

Filter6

As seen in the preview:

Preview6

The last filter puts it all together: an Override Custom filter uses variables to combine the output of several filters in a nice readable way. In this case all the variables are variations of the filter output, but other variables are available too. Something that isn’t immediately obvious is that you can insert numbers to reference specific filters (otherwise it refers to the previous one):

Filter7

Which results in:

Preview7

So now that we’ve got some nice output text, what do we do with it? Of course, you can just see it in the Tests list, if you have the last change and failure displayed:

Tests

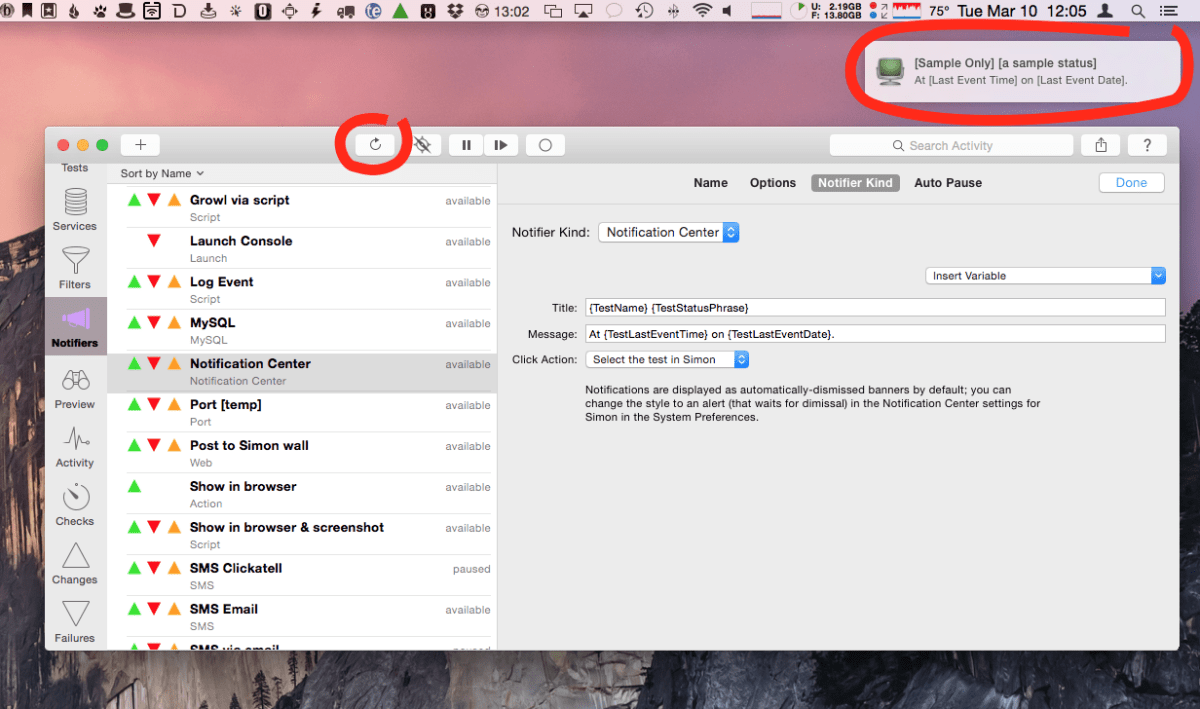
But you’ll probably want to get a notification:

Notifiers

I hope this case study is helpful. Most tests don’t need a series of filters like this, and there are other ways to achieve similar effects (like writing all the logic in a script), but it can be very useful when you want it. You can use similar techniques in your own tests.
How can I play a sound during a break in Time Out?

To play a sound or perform other actions before, during, or after a break, check out the Actions page of the break editor:

Actions page

Other actions include the ability to display a notification (with an optional sound), fade out the currently playing sound (useful at the end of the break), flash the screen, and speak some text with speech synthesis. Several scripts are provided, too.

To add an action, simply click the + button in the top-right corner of the window, to display a menu of available actions:

Add action menu

(When you first click this button, the scripts won’t be there, and there will just be “More…” item at the end; choose this to install the scripts.)

The first bunch are the various actions, followed by scripts, which are like customizable actions. At the end of the menu are items to open the Scripts folder in the Finder, so you can edit or add scripts, and go to the Time Out Extras page to download more scripts.

Once you add an action, you’ll see a header row with the name of the action and some other controls:

Action header

You can use the interval picker and pop-up menu to indicate when to use the action. The interval picker enables you to offset from the action stage by a number of seconds, minutes or even hours (click on the units to change them). Instead of just being able to play a sound at the start and/or end of a break, you can choose from many more times, including before due, after skipping, and more:

Action when menu

After those controls is a Preview (Preview) button, that will demonstrate the action. And a Remove (Remove) button to remove the action.

Here is a brief video to demo the feature: adding a Play Sound action to play a long music track, and a Fadeout Sound action to make it fade out when the break successfully finishes. (You might instead want to have it fade out for any end, otherwise it’d keep playing till done if you skip.)

This is a powerful and flexible feature of the app, especially when using custom scripts.

On vacation

Please note that I’ll be on vacation for the next couple of weeks, with unknown internet access, so support queries may be delayed. Please post to the /r/Dejal community on Reddit, so others may be able to assist.

My wife and I will be dropping off our motorhome for servicing, our cat Paladin for boarding, and will be catching flights for the first time in years, heading to the US Virgin Islands to celebrate Jenn’s milestone birthday.

Paladin

No doubt I’ll take lots of photos, and will do posts on my Sinclair Trails blog once we’re back, so you can look forward to that.

Next Dejal post on the 21st. See you then!

Why are my Simon tests timing out on my Apple Silicon Mac?

If you install Simon on an Apple Silicon (M1, M2, etc) based Mac, you may notice Web Page tests timing out.

That is because the Web Page service uses an embedded helper tool to load the HTML in a separate process, to improve performance and reduce the risk of crashing Simon. But currently this helper is Intel-only. Some other helpers, e.g. to send emails or upload reports to a remote server, are also Intel-only.

This is fine, but it means that you need to install Rosetta, Apple’s emulation layer to enable running Intel apps on Apple Silicon.

The main Simon app is universal, so launching it won’t prompt to install Rosetta, but you can override that by checking the “Open using Rosetta” option in the Finder’s Get Info window:

Open using Rosetta

Just remember to uncheck that option after you’ve opened Simon, so subsequent launches use the universal code.

Using Simon to watch YouTube subscriber counts

A customer sent a query, asking how to use Simon to monitor the subscriber counts on YouTube channels.

This is easy for Simon to do, by having Web Page tests for each YouTube channel, each with a filter to extract the subscriber count, and whatever notifier you wish.

The first step is to add a Web Page test for a YouTube channel, and look at the HTML output in the Preview pane, to find how the subscriber count appears.

Test

For example, for my Sinclair Trails channel, the HTML includes:

    "subscriberCountText":{"accessibility":{"accessibilityData":{"label":"30 subscribers"}},"simpleText":"30 subscribers”},

Yes, I currently only have 30 subscribers… rather sad. Please subscribe to help me reach a more respectable number!

A sensible default choice for a filter is the Block one, though in this case a better choice would be the Find Regular Expression filter. But if you want to have several tests with the same notifier configuration, an even better choice is to create a new custom notifier, so you don’t have to configure the notifier for each test.

A regular expression to extract the subscriber count from that HTML could be:

    subscriberCountText.+?simpleText\":\"(.+?)\”\}

This will look for text starting with “subscriberCountText”, some more text, then “simpleText”:"” , then capture the desired text up until “”\}” .

In my case, that will result in:

    30 subscribers

To make a new filter for this, you can go to the Filters page in Simon, and add a new filter named “YouTube subscribers” (or whatever you prefer).

Then choose Find for the Filter Kind, and Regular Expression from the find options menu:

Find options

Then enter the expression as the find text, and choose Capture 1 as the output:

Custom filter

Click Done, then go back to your YouTube test, and choose this new filter on the Filters page:

Test filters

This will output just the subscriber count:

Filter output

You can see this output in the Activity log:

Activity log

Or you can add a new Email notifier to email the filter output using the {FilterOutputText} variable:

Email notifier

And of course use that notifier in your test, along with whatever other notifiers you wish:

Test notifiers

Then you can add more tests for other YouTube channels you want to monitor, specifying your YouTube subscribers filter for each. For example, CGP Grey has a few more subscribers than me:

CGP Grey test

I hope this helps!

New and updated Time Out themes: Sinclair Trails and Tropical Rain

As you know, Time Out dims the screen and by default shows its icon during a break, but has the ability to show other content via themes, as a reward for supporters of the app. Just dimming the screen is enough for a break, fine for people who want the basics, but avid users of the app can keep things interesting with other themes.

The theme can be changed on the Break Appearance settings page; click the blue Info button next to the pop-up menu to learn about the theme, and try it via the Preview button:

Appearance settings

One of the built-in themes is called Tropical Rain; it was kindly contributed by Time Out customer Nick Kaijaks. It play a HD YouTube video of a tropical rain forest, with the gentle sound of rainfall, starting from a random offset in the video, so it’s different for every break.

On macOS Ventura the theme stopped working, so it has been updated to fix that. I also increased the volume of the rainfall to 50%, since some people mentioned that they couldn’t hear it. You can adjust the volume by editing the index.html file within the theme; look for the follow line; the value can be anything from 0 to 100:

    var VOLUME = 50;

The corrected theme will be bundled in the next update of Time Out, but in the meantime you can download the update here. To install it, choose the Reveal Themes command from the end of the themes pop-up menu, and drag the uncompressed theme folder into the revealed Themes folder in the Finder, replacing the existing one.

Tropical rain theme

I have a YouTube channel called Sinclair Trails where I post timelapse videos of our motorhome travels around the US. I recently posted a video that combines the timelapse videos from 2022 into one faster video. So having just updated the Tropical Rain theme, it occurred to me that I could make a copy of that to play random parts of my timelapse video. And so the Sinclair Trails 2022 Timelapses theme was created; you can download it here.

Sinclair Trails 2022 timelapses theme

This theme plays the video without any sound. Again, you can adjust that by editing the theme source. Or use a Break Action to play your own music if you prefer.

I also have a similar timelapse video from 2021, which is available as the Sinclair Trails 2021 timelapses theme; you can download it here.

Sinclair Trails 2021 timelapses theme

Finally, I also added a theme that just shows the Sinclair Trails blog, which has new posts every day. You can follow along on my adventures exploring the country while you take your breaks. You can download this theme here.

Sinclair Trails blog theme

Why haven’t I received an email from Dejal?

If you send an email to Dejal asking for support, you should expect a reply within 24 hours. If you don’t get one, chances are your email service has mis-flagged it as spam. So check your spam folder.

If you use the contact form, and request a reply, you will get an automated reply email from the Dejal server within minutes, acknowledging receipt. And will get a personal reply within 24 hours, if needed. So if you don’t get that automatic reply, again check your spam folder.

I know it’s frustrating to write to a company and not get a reply. As an indie developer, I strive to provide excellent customer support. But it’s just as frustrating for me when I write a lengthy reply and it bounces due to a mail server being full, or thinking its spam, or other issues. So please check that you don’t have overly aggressive spam filtering if you’d like to receive a reply.

Another alternative to email, if you want to bypass those possible hassles, is to post in the Dejal community on Reddit, r/Dejal. I check that every day (well, most of the time), plus other members may be able to help you too.

And of course check the Frequently Asked Questions list, in case your issue is a commonly asked one.