Simon Context filter

The Context filter in Simon is a sophisticated filter that takes the previous filter’s input and match range to output some context around that filter’s output text.

It includes controls to specify the maximum number of characters before and/or after the matched range, and/or a delimiter before and/or after the matched range. So for example you can show up to 50 characters, stopping at a line break.

This filter is unusual in that it requires a previous filter to be used, and that needs to be either a Block– or Find-based filter, as those are the only ones that output the needed match range information.

The Context filter uses the Input specified in the test to determine which filter’s input and match variables to use: if you have two previous filters, you can make the Context filter look at the first one by choosing Filter1OutputText instead of the default FilterOutputText (which means the proceeding filter).

The match range is available in variables used by the Context filter, and can be used in your custom filters or notifiers if you wish:

  • {FilterMatchLocation}: the position of the match in the input text, e.g. the text between the Blocks, or the Find result. Note that the location is zero-based.
  • {FilterMatchLength}: The length of that match.
  • {FilterMatchEnd}: The location plus the length, for convenience.

You don’t need to worry about these variables for the Context filter, though; it uses them internally.

Here’s a simple example of this filter in action.

This is from a Web test that looks at the Daring Fireball site. It has a Find Required filter to look for the word “finally”, then if that succeeds a Context filter to output the enclosing paragraph. To round it out, if the Find filter fails, the Override as Unchanged failure case is used, to avoid the test resulting in a failure if Gruber hasn’t used the word “finally” recently.

Below the filters, you can see the Preview pane’s output, which you’ll notice includes the word “finally” towards the end.

Context filter

I hope this will be a useful filter for many of your tests. Simon is a powerful tool, with lots of other handy filters, services, and notifiers.

Time Out Dock icon and status item

Time Out has several handy options, some of them only available to current or past supporters, as a reward for helping improve the app.

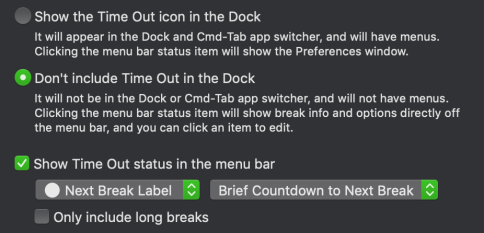
One such option is the ability to hide the app icon from the Dock. By default, the icon is shown there, for easy access, but if you want Time Out to operate more in the background, you can choose to remove the icon.

If you do so, the second option is automatically turned on: the checkbox to show a status item on the right-hand side of the menubar. This item has further options to choose what to include there.

General settings

The status item can optionally include a variation of the app icon, the label color of the next break, or neither:

General settings

It can also include a countdown to the next break, either in a compact form like “7m” for 7 minutes, or a wider form like “07:32”, for 7 minutes and 32 seconds. In the compact form, it only shows seconds when less than a minute. That’s my favorite form, to attract attention when getting close to a break.

Alternatively, the value can show the time when the next break is due, or will finish, or how long it is. Or no value, just an icon:

General settings

There’s a further checkbox to only show long breaks in the status item, i.e. don’t show ones with a duration of less than a minute.

A further useful tip about the status item is that if you hover over it, a tooltip will appear that lists when the upcoming breaks are next due:

General settings

When the Dock icon is shown, clicking the status item will bring Time Out to the front, to show the settings window. When the Dock icon is hidden, clicking it will display a menu-like popover of the sidebar, for quick background access to the breaks and options. Clicking one will expand to the full window.

You may wonder what happens if you hide both the Dock icon and the status item. The window will display a warning message:

General settings

As the message says, if you do this, you can still access the settings window, though it’s a bit harder. You would need to find Time Out in your Applications folder and double-click it to make it active. Since the Dock is hidden, it won’t show a menu bar, so there isn’t a visual indication that it is active, but you can press ⌘, (i.e. Command and Comma together), which is the keyboard shortcut for the Settings window, to show it.

Some people like doing this, to discourage changing settings, but most people should show either the Dock icon or status item, or both.

Time Out fixed image and blog themes

I got a support request for Time Out, my popular break reminder tool, asking to display a fixed image during the break.

Time Out uses HTML pages as break themes, so it is possible to have a fixed image as a theme — in fact the default theme, Icon, does just that, with the app icon.

So one way to have a fixed image is to:

  1. Choose the Reveal Themes command at the end of the Theme pop-up menu to open the Themes folder in the Finder.
  2. Duplicate the Icon theme folder and give it a new name.
  3. Replace the icon.png file with your chosen image.
  4. Edit the index.html to adjust the name and size of the displayed image.
  5. Edit the Info.json file to give the new theme a unique identifier etc.
  6. Pretty easy. You can edit those files in TextEdit or any other text editor.

If the image is available on some website, it’s actually a little easier. I have created an example theme on the Time Out extras page:

Download the Ducks & Fish theme

You can edit a copy of this theme to use a different image:

  1. Choose the Reveal Themes command at the end of the Theme pop-up menu to open the Themes folder in the Finder.
  2. Add the Ducks & Fish theme, if not already.
  3. Duplicate that theme and give it a new name.
  4. Edit the Info.json file to give the new theme a unique identifier, and change the URL to the desired image.

(This got me thinking, and I spent an hour or so writing up notes on ways to make adding image-based themes even easier in a future version. I’m always trying to improve the app.)

While I was at it, I also added four themes to display my four blogs; these are all included with Time Out by default:

  • Dejal Blog: a theme that simply shows the Dejal blog, so you can read it during your break, to see the latest news about Time Out and other Dejal apps (doesn’t update very often, though, so probably not that exciting for a regular break).
  • Dejus Blog: a theme that shows my personal blog, where I post photos and comments every day. Could be good for a short break a once or twice a day.
  • Sinclair Trails Blog: a theme to show the Sinclair Trails blog, about my travels around the US in a motorhome, including photos and timelapse videos of driving days, photos of places we stay, and of attractions we visit.
  • Yellow Cottage Blog: a theme to show the retired Yellow Cottage Homestead blog, about the chickens, ducks, feral cats, bees, and other homestead topics of my former homestead. Could be good for a lunchtime break.

If you try those, you might want to set the Opacity to 100% on the Break Appearance page.

Time Out isn’t a web browser or feed reader, but since the themes are just web pages, these show some of the interesting things you can do.

How can I use Simon to check for an expired website SSL certificate?

I received a customer query asking how to use Simon to check for an expired website SSL certificate.

Of course, Simon is very flexible, so even if there isn’t a built-in service for this specific case, if you can do it in the Terminal, you can probably create a custom script-based service in Simon to do it, too.

There are a number of ways to get certificate information, but this is one simple approach (if you know of a better way, let me know!).

I created a new script-based service, using the basic C shell, a one-line command, and a custom variable for the host name:

Website Certificate service screenshot

I then created a new test using this service. When accessing a server with an expired certificate, the output includes a “verify return code” message of “certificate has expired“, so I used a Block filter to look at just that text (I pasted “Verify return code: ” in the Start text, and an Option-Return in the End text), then a Find Required filter to make the test result in a failure if it doesn’t find “ok“, and finally an Override Custom filter if a failure, to output the error message:

Website Certificate test screenshot

For the success case, the last filter doesn’t apply, so it just outputs the “ok”:

Website Certificate test screenshot

Want to use this service? You can easily add it yourself, or import it by downloading from the Simon Extras page.

I hope you found the techniques in this post helpful.

How can I add lunchtime & night breaks to Time Out?

On Twitter, Abbey Jackson asked:

Sure! Here’s the Schedule page for my Time Out preferences, showing my Lunchtime break configuration:

Lunchtime schedule screenshot

There are two important steps to do this: firstly, set the frequency to Every 1 day, and secondly, use the Available options to set a fixed start time of noon. In my example, I have this break only occur on weekdays. I also have the natural break option set to Continue Countdown, since I want the break to start immediately, not get pushed back due to idle time.

Didn’t realize that you can set daily breaks? Yep! Click, arrow, or tab to the units of the duration (“Break for“) and frequency (“Every“) fields to change between various units: seconds, minutes, hours for the duration, minutes, hours, days, weeks, months, years for the frequency.

As a bonus, here’s my Night break, that tells me to go to bed:

Night schedule screenshot

This is similar, but a longer duration. And yes, I did go to bed rather early when this screenshot was taken, as I usually got up at 05:30 (but didn’t get to my Mac till after breakfast).

Hope this helps!

Can I add Time Out breaks to my Calendar?

I had a customer wish that Time Out could track breaks taken in their Calendar app. That is definitely an interesting idea, so I added it to my feature concepts list for consideration in a future version, but it occurred to me that we could probably do that now with AppleScript actions.

As you may know, Time Out has the ability to perform various actions before, during, or after a break occurs. I made two AppleScripts based on Apple’s sample code for the Calendar app, and added them to the Time Out Extras page.

Download the scripts now.

The “Add to Calendar Start” script creates a new “Time Out break” event in the first available calendar, at the current time, with a duration of an hour. To use this in Time Out, install it as normal (reveal the scripts folder via the + button on the Break Actions page, and add the two scripts there), then add an action set to be performed “After Start”.

The “Add to Calendar End” script finds that event (assuming it is still within that hour), and updates the end time to the current time. So to use this, add an action set to be performed “After Any End” (i.e. when the break finishes, done or not).

Here’s how it’ll look in Time Out (with a couple of sound actions for good measure):

Time Out actions

If you want to add the events to a different calendar, you can edit the scripts (I included a commented out example). Just make sure you change both the same way.

I may add a more integrated calendar feature in the future, but in the meantime, it’s great that such enhancements can be done immediately. I hope this is helpful to some people.

Hot take on the Apple Vision Pro

Yesterday at the WWDC23 keynote, Apple introduced a new hardware platform, the Vision Pro.

It’s always fun to give hot-takes and first impressions on a new technology, especially when I haven’t tried it yet, so here’s mine, for what it’s worth.

I’m excited about it. While the initial device is far short of the ideal of unobtrusive glasses or similar, that let you overlay information on the world (augmented reality, or AR), it has an impressive array of technology and concepts, showing great potential.

I don’t know how comfortable it would be to wear for hours, or how well the virtual windows within the AR space would turn out for real work, but if anyone can get these sorts of things right, it’s Apple. And remember that this first one is the worst offering; Apple has a history of iterating and improving over the years, so it will get better and better.

For myself, I could imagine using this device to give me larger screen space for my app development work. I currently work from a laptop in my motorhome, sometimes with a magnetically attached screen. So being able to wear a headset and have vastly larger screen space is quite attractive.

Of course, using it with a Mac seems a bit limited at present, just expanding the existing screen. So that is less useful, since my development work is done on a Mac. But that may change over time, either by enhancing Mac integration, or by moving the Xcode development tools to the visionOS platform.

For non-work purposes, the Vision Pro seems like it would make a great entertainment device. I don’t watch TV nowadays, and have never been a gamer, but I could imagine the device being perfect for such activities, with its ability to make the show/game as immersive as desired.

I really like the reality dial thingy — the ability to twist a knob to change between an AR experience, with the outside world visible, to a fully VR environment. Great for plane trips or other distracting environments.

I don’t suffer from motion sickness, but for those who do, it sounds like Apple has done a lot of work to reduce those symptoms. And the aforementioned dial should help, by keeping the outside world visible to reduce nausea.

Another interesting feature is the external screen that shows the eyes of the user when interacting with others. Time will tell how well that works; it could be a disturbing uncanny valley situation, or it could work really well. It reminds me of transparency mode with the AirPods Pro; a way to interact with the outside world, while being immersed in another world.

I was amused by first-day hot-takes from people saying that they’d never buy one of these, or would refuse to interact with someone wearing one. It’s too soon to tell; I think like with other technologies, if they become widespread, people will get used to them. It won’t be a big deal.

Like with other new platforms Apple has introduced in the past, the initial version is just a starting point. As people get the devices and developers make apps for it, usage patterns will become clear. Apple introduced the iPhone as “an iPod with touch controls, a phone, and a breakthrough internet communications device”. At the time (I was there), people applauded the iPod and phone aspects, and were a little confused by the internet communications part. But it turned out that the iPod and phone were minor features of the device, and it’s all about the internet aspects. Similarly, the Watch was promoted as a communication device (Digital Touch?!), but evolved into primarily a fitness and notifications device. The Vision devices will no doubt similarly evolve based on how people end up using them.

All in all, I am excited for the potential. I may or may not get the first model (it’s rather expensive!), but I’m very tempted.

Adding Time Out to Accessibility System Settings to enable idle detection

One of the features of Time Out is the ability to detect natural breaks, i.e. when your Mac is idle, not being used.

Time Out looks at mouse/trackpad and keyboard activity to detect this, but for privacy reasons, macOS requires your approval to see keyboard activity. The app doesn’t look at what you’re typing, just that keys are being pressed.

If you don’t want to authorize this, that’s fine; either Time Out can just watch for mouse/trackpad activity, or you can change the natural break detection method in the Advanced settings in the app:

Advanced settings

You can disable idle detection entirely from that menu if you wish. There’s also a popup menu to choose how long the computer should be idle before considering it a natural break.

When you first launch Time Out, the second page of the Setup Assistant includes instructions on how to authorize idle detection. It’s pretty simple, though a number of steps to navigate to the right place:

  1. Open System Settings.

  2. Go to the Privacy & Security pane.

  3. Go to the Accessibility page.

  4. Time Out should be listed; if it isn’t, click the + button below the list to find and add it.

  5. Toggle the switch next to Time Out to be on (dot on the right).


Easy!

Simon extras

Dejal Simon is a powerful and flexible website & server monitoring tool. One of the reasons it is so flexible is that in addition to the many built-in services, filters, notifiers & reports, you can extend it by using or writing custom scripts (or port sessions).

Simon comes bundled with many examples of such scripts; check out the Services, Filters & Notifiers lists and look for the items with a “Script” subtitle. You can inspect and edit those to customize them to suit your needs, or use them as inspiration for your own.

As an additional resource, the Simon site has an Extras page, which lists several more scripts that customers have contributed over the years. Some of which have later been bundled with the app, but some are only available there.

If you create or modify a script that others might find useful, please share it! Send me an email with the script attached, along with a description, and I’ll be happy to add it to the Simon Extras page.

The Simon Extras page is organized by feature kind: Service Scripts, Filter Scripts, Notifier Scripts, Report Templates, and Other Goodies (including a way to add multiple tests, an extended siren sound, and a script to monitor a FTP site). There’s also info for developers on writing custom plugins.

Installing scripts is easy:

  1. Decompress the downloaded archive, if you browser didn’t do it for you;
  2. Launch Simon if not already running;
  3. Go to the Services or Notifiers list, as appropriate;
  4. Click the New toolbar button (or via the File menu);
  5. Choose the Service Kind (or Notifier Kind) button to show the service (or notifier) page.
  6. Choose the Script service/notifier kind, if not selected by default.
  7. Click the Open Script… button and choose the script file.

The script is copied into Simon, so there’s no need to keep the downloaded file around after loading it.

Where can I find more sounds for Time Out or Simon?

Time Out comes with a number of built-in sounds that you can play as part of the Break Actions, plus it lists all sounds you have installed on your Mac, which includes system default ones, and any you have added to the standard sound folders.

It’s worth noting that you can also have Time Out play any music from your Apple Music library, too.

Find more sounds

To add more sounds, you first need to find and download them from a website.

There are many sites that offer sounds of varying length, quality, themes, etc. Some for free, some as paid offerings. Usually with previews so you can listen before downloading.

Here are a few I’ve found; note that I don’t endorse or recommend any particular site; these are just ones I encountered in a brief search. If you’re aware of or find a better site, please post in the Reddit community to share with others.

Add the sounds

Once you have the new sounds, you can easily add them in one of the standard folders to make them available to all apps that can play sounds, or add them to the “Sounds” folder within the Time Out data folder to only make them available in Time Out.

The system sound folders you can add to are in the following paths (tip: you can paste these paths into the Finder’s Go ▶ Go to Folder… command to reveal them; if the folders don’t exist, you can create them):

  • /Library/Sounds — for sounds available to all users of your Mac.
  • ~/Library/Sounds — where “~” means your home folder.

(There is a third folder, at /System/Library/Sounds, but you shouldn’t modify that.)

On the other hand, Time Out’s sounds folder is at one of the following paths, depending on which edition of the app you have:

  • ~/Library/Group Containers/6Z7QW53WB6.com.dejal.timeout/Sounds — for the direct edition.
  • ~/Library/Group Containers/6Z7QW53WB6.com.dejal.timeout.free/Sounds — for the Mac App Store edition.
  • ~/Library/Group Containers/6Z7QW53WB6.com.dejal.timeout-setapp/Sounds — for the Setapp edition.

While you can use the Finder’s Go to Folder… command to access those, an easier way is to choose Reveal Scripts from the Add Action drop-down menu. That will show the Scripts folder, which is adjacent to the Sounds folder. (I do want to make this even easier in a future update.)

Simon is much the same, except will just look in the standard folders.

I hope this has been helpful!